Configure free Cloudflare SSL certificate for Godaddy Shared Webhosting
Set up free SSL certificate from Cloudflare
SSL is not only to secure the website but also to improve your SEO ranking. Usually, the new domain does not have SSL (Secure Sockets Layer) certificate installed by default and the website will show a “Not Secure” icon & text right before the URL. That means all customer data submit or request to the website is not secure. Most companies offers paid SSL certificate for any domain. However, you might be interested in securing the website with free SSL. This article explains how to register & get a free SSL certificate from Cloudflare and integrate it with your Website. We will be using Godaddy Shared Webhosting to install & activate the SSL certificate(cert) with the private key.
Table of Contents
Step 1: Sign-up with Cloudflare
First, you need to register with Cloudflare
Go to https://dash.cloudflare.com/sign-up
Give a valid email address and password and create an account in Cloudflare
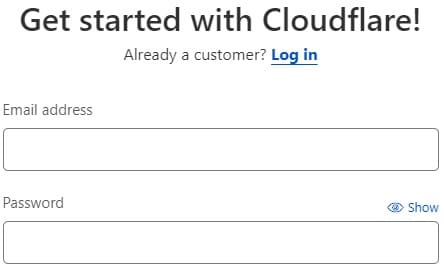
You might receive a verification mail. Just click on the verification link to activate your Cloudflare account.
Step 2 – Add your website
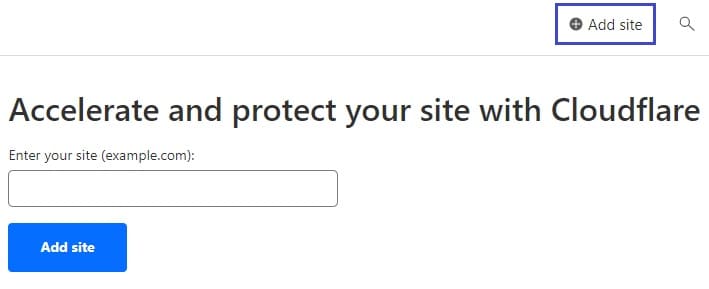
Login into the Cloudflare account
On the top-right side, click on Add Site link.
Enter your domain name (sitename.com without https:// prefix) and click on the Add Site button.
It has 3 steps:
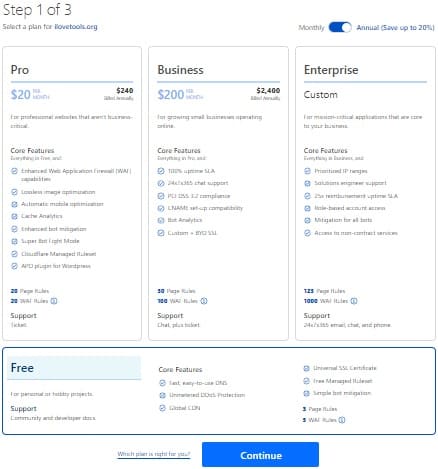
1 of 3: Select Free plan
Cloudflare is not only for SSL but also for CDN which will improve your page load time as well if used properly, it provides multiple paid plans but we will go with the Free service plan
Choose the Free plan and click on the Continue button
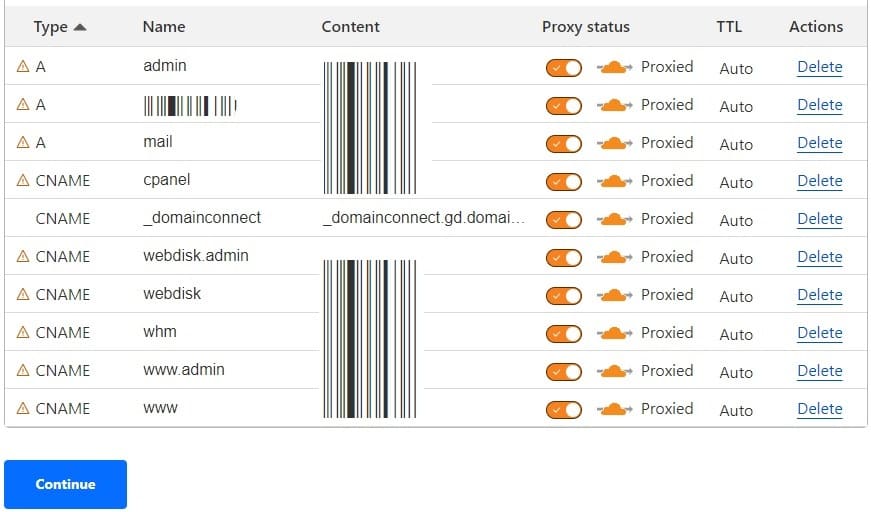
2 of 3: Review DNS records
Cloudflare will scan and fetch all DNS records from the web hosting server automatically, below screenshot shows records from the ‘Godaddy’ nameserver.
Simply click on the Continue button
3 of 3: Changing nameservers
See the screenshot below, you should complete the 4th step. It will show the Cloudflare nameservers which you need to replace in your domain server(Godaddy)
Don’t click on the ‘Done, check nameservers‘ button until the 4th step is completed – that is, updating nameservers in Godaddy.

Follow next step and replace Godaddy’s nameservers with Cloudflare’s nameservers
3 of 3(a): Update Godaddy nameservers with Cloudflare
Log in to your GoDaddy account
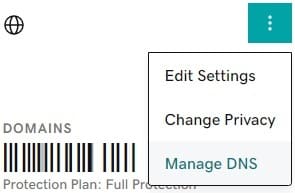
go to My Products >> your domain >> click on three dots and click on Manage DNS
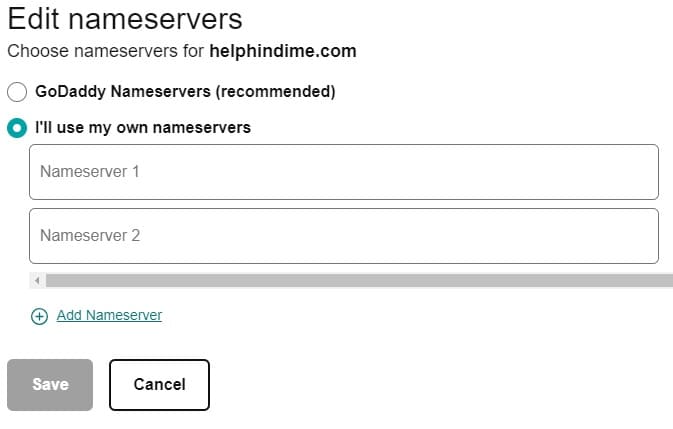
Go to the Nameservers tab section and click on the Change Nameservers button.

It will show the Edit nameservers popup.
Select “I’II use my own nameservers“.
Copy the nameservers from Cloudflare and add them to Godaddy’s DNS (Nameserver 1 & Nameserver 2).
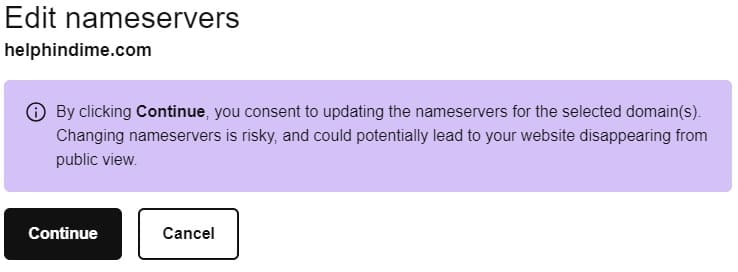
Click on Save button.
It will ask for your confirmation to update nameservers for the selected domain(s), just click on Continue.
The new custom DNS(nameservers) is updated.
3 of 3(b): Activate Cloudflare nameservers service
Now, Go back to the Cloudflare website and complete the 5th step (see the screenshot below)
1. Click on “Done, check nameservers” which will save your changes
2. Click “Finish Later“
3. Click on ‘Check nameservers‘ to detect new nameservers, manually.
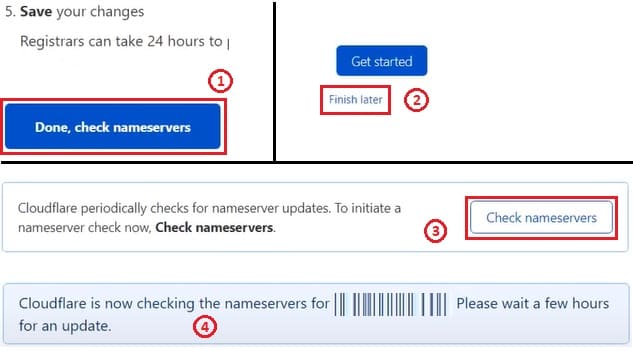
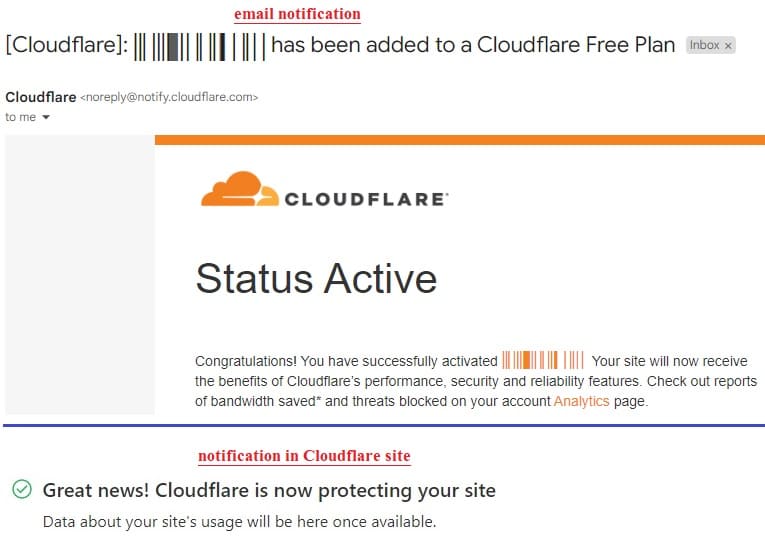
You can see the message – “Registrars can take 24 hours to process nameserver updates. You will receive an email when your site is active on Cloudflare”.
But the whole process of updating the nameserver usually gets completed within an hour.
It will automatically keep checking and you will get an email notification from Cloudflare once the process is complete as well as a message on the Cloudflare site once it is successfully activated. (see the below screenshot)
Once the above process is completed, visit your site and check for a secure connection.
It should show a secure connection with the lock symbol
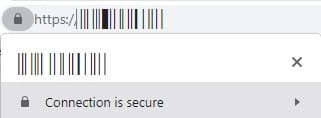
The process of Removing ‘Not secure’ and showing a secure connection for a website is completed.
Cloudflare applies Flexible SSL/TLS encryption mode by default, which means, Encrypts traffic between the browser and Cloudflare
To check this: goto Cloudflare >> select your site >> click on SSL/TLS >> Overview
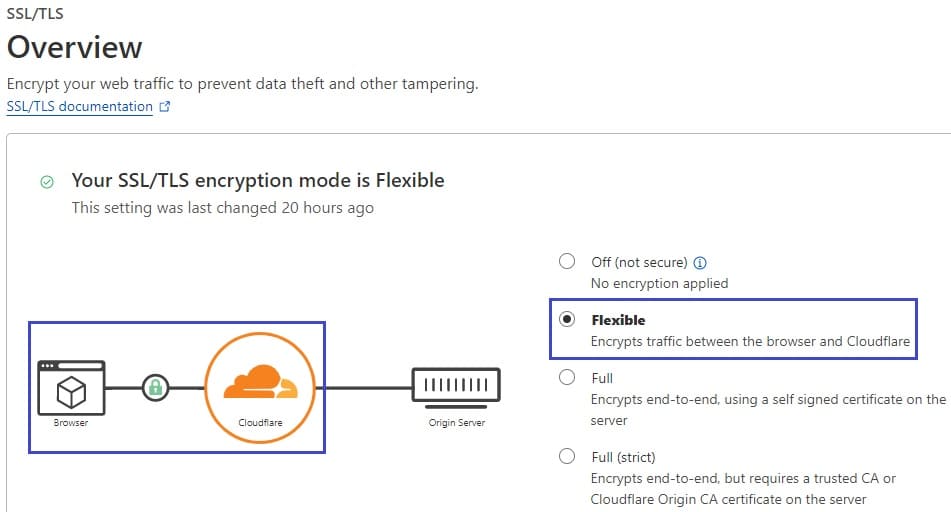
Skip the further steps if you are ‘OKAY’ and satisfied just showing your website with the Flexible(basic) security but it is highly recommendable to implement end-to-end encryption. Follow a few more simple steps to make your site fully secure.
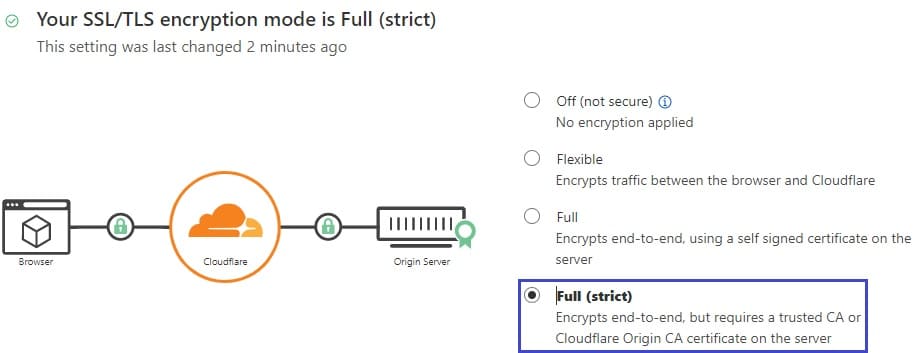
Step 3: Change Flexible to Full(strict) secure connection
Full security, end-to-end SSL/TLS encryption – Steps
Full(strict) secure connection – Encrypts end-to-end, a trusted CA or Cloudflare Origin CA certificate on the server
1) Generate SSL Certificate and Private Key in Cloudflare
Go to Cloudflare >> click on your website >> SSL/TLS >> Origin Server and click on Create Certificate button.

On the Origin Server page, just select max Certificate Validity (15 Years) from the dropdown. (don’t change anything else) and click on Create button

It will show Origin Certificate and Private Key, you need to install them into Godaddy’s SSL website (copy & paste)

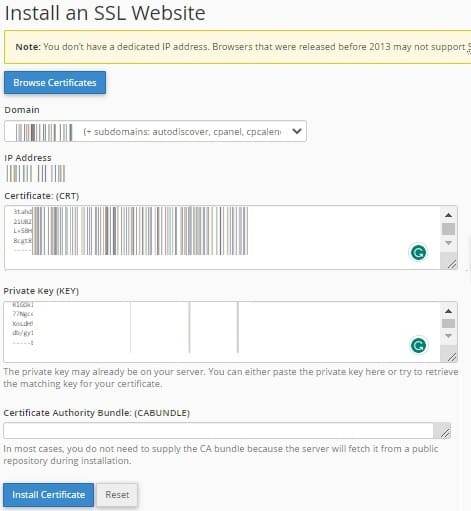
2) Install an SSL Certificate in Godaddy
Go to your Godaddy’s cPanel hosting >> SSL/TLS >> Manage SSL sites.
Scroll down and go to ‘Install an SSL Website‘ section
Select your domain from the dropdown list.
You can see Certificate and Private Key fields – copy keys from Cloudflare and paste them into Godaddy’s corresponding fields, one by one.
a) copy Cloudflare’s Origin Certificate and past it into Godaddy’s Certificate (CRT) field
b) copy Cloudflare’s Private Key and past it into Godaddy’s Private Key (KEY) field
And click on Install Certificate
It will popup a success message – SSL Certificate Successfully Updated.
Click on the OK button

Godaddy configuration is done
Now, go back to Cloudflare and change SSL security from Flexible to Full (strict)
That’s it, Protecting your Website with full end-to-end Protection/security is Done.
Check your website prefix with https:// – it should show a secure lock symbol with full security.
Thanks 🙂