How to Integrate MailChimp v3.0 API in DotNet Core C#
In this post, we will discuss how to use MailChimp in the .Net Core application, which Nuget Package needs to be used, how to create or add Audience, Subscribers, Email Template, Campaign, and generate reports using C# code. We will be using the MailChimp.Net.V3 Nuget package developed by Brandon Seydel. It is a .Net Wrapper for Mail Chimp API and easy to implement with a few lines of code.

First, let’s understand MailChimp and how to use it.
What is MailChimp?
Mailchimp is an Email Service Provider (ESP) and one of the most famous email marketing software or platforms in today’s world. It is used to develop & manage newsletters, and send automated emails to the customers (list of users). Assume you have a mailing list and want to send a weekly newsletter to every individual. This process can be automated with MailChimp service and you can reach out to your client, customer, and other interested parties to grow your business.
Free to use
It is free to use up to 2000 contacts with a limit of 10,000 emails per month with a daily limit of 2,000
A free plan is also available which allows you to add 2000 contacts and send 10,000 emails per month with a daily limit of 2,000.
How to send marketing emails via MailChimp?
Below are the basic steps to send emails to target users (subscribers).
1) Create an Audience – it is just like a group name, for example, the Audience Name could be named as WeeklyNewsGrp. In code, we will be using Audience ID.
2) Add subscribers – adding email addresses to an Audience.
3) Create Template – HTML content with text, images, URL, and other stuff
4) Create Campaign – final step where you must select:
a. To address – targeted audience name
b. From address
c. Subject – short text
d. Content – this is your template
Once all the above steps are done, either you can send it immediately or schedule it for a future date. Later, you can also generate the Campaign Report to know each subscriber’s status & activities.
Using MailChimp in .Net code – C#
To use MailChimp in .Net Core project you need to install the MailChimp.Net.V3 package, developed by Brandon Seydel. It is licensed under the MIT license. You can see more about it here
Install this package in your project, for example – Business Layer.
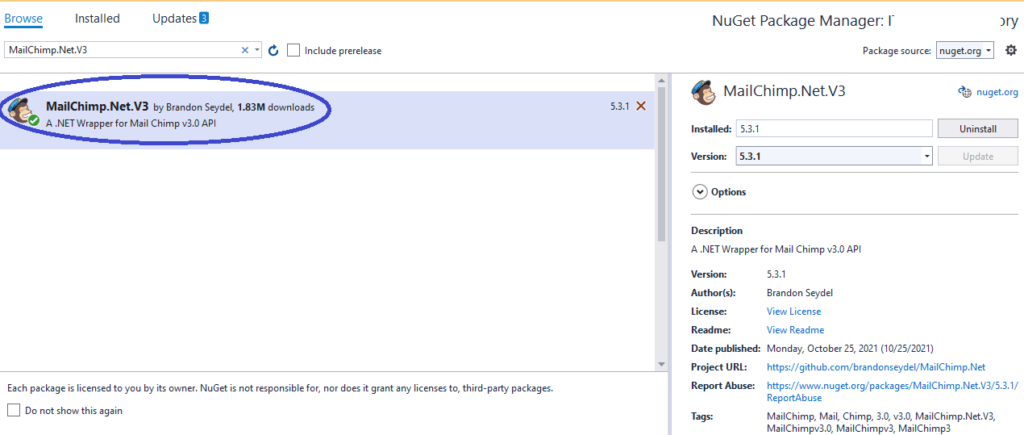
Installing from package manager console – Install-Package MailChimp.Net.V3
Get the API Key for development
Before you start implementing the code you should have a MailChimp API Key handy. You need to pass this API Key whenever you are performing any action via code like creating an audience, adding members, getting reports, or any other request.
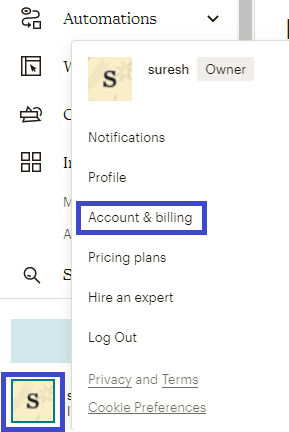
1) Login into your account (you can register with a free plan for development purposes)
2) Click on Account (left-hand side below) >> click on Account & billing. It will open the account page.
3) Click on Extras >> API Keys. It will open the API Key page.
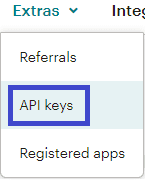
4) you can see API Key as shown in the below screenshot.

Let’s start coding in C# – Mail Chimp – Step-by-Step
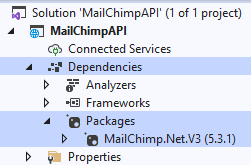
Create a .Net application and install the MailChimp.Net.V3 NuGet package in your project.
Configure API Key in appsettings.json
"MailChimp": {
    "ApiKey": "60exxxx-Your-API-KEY-xxxxxxxxb8-us20"
  }
1. Create an Audience
First, the audience name needs to be created to add the email addresses.
Consider “Audience” as a group name where you need to add a list of subscribers’ email Ids.
Note: AudienceID is known as listId in code.
I have written all MailChimp related code in a separate static class so that any method can be called by just passing the necessary parameters. Create a .cs file and name it as MailChimpHelper.cs. Below is the code to add an Audience.
using MailChimp.Net;
using MailChimp.Net.Interfaces;
using MailChimp.Net.Models;
using System;
using System.Collections.Generic;
using System.Linq;
using System.Threading.Tasks;
using System.Web;


public static class MailChimpHelper
{
    public static async Task<string> AudienceAddAsync(string apiKey, string audienceName, Dictionary<string, string> config)
    {
        string newAudienceId = string.Empty;

        IMailChimpManager mc = new MailChimpManager(apiKey);

        try
        {
            /*All inputs are mandatory.
			 Store these default values in some config file or database*/
            var audience = await mc.Lists.AddOrUpdateAsync(new List
            {
                Name = audienceName,
                PermissionReminder = config["PermissionReminder"], //You are receiving this email because you opted in via our website.
                Contact = new Contact
                {
                    Company = config["Company"],
                    Address1 = config["Address1"],
                    City = config["City"],
                    Country = config["Country"],
                    State = config["State"],
                    Zip = config["Zip"]
                },

                CampaignDefaults = new CampaignDefaults
                {
                    FromEmail = config["DefaultFromEmail"], //Registered emaild id
                    FromName = config["DefaultFromName"],
                    Language = config["DefaultLanguage"], //"en"
                    Subject = ""
                }

            });

            newAudienceId = audience.Id;

        }
        catch (Exception ex)
        {
        }

        return newAudienceId;

    }
}
Call this static method from business class or wherever you prefer. See the sample code below.
public class Business
{
    private readonly IConfiguration configuration;

    public Business(IConfiguration _configuration)
    {
        configuration = _configuration;
    }

    public async Task CreateAudience()
    {
        //get the MailChimp API Key from appsettings.json
        string apiKey = configuration.GetSection("MailChimp:ApiKey").Value;

        //Get Audience Configuration details from database or config file.
        Dictionary<string, string> audienceConfig = GetAudienceConfig();

        string newAudienceName = "WeeklyNewsGrp";
        string newAudienceId = await MailChimpHelper.AudienceAddAsync(apiKey, newAudienceName, audienceConfig);

        //save newly created Audience Id in DB
        SaveNewAudienceId(newAudienceId);
    }
}
Debug – Code will return the newly created “audience.Id” which is also known as “listId”.

The below image confirms Audience has been created via code and the same can be seen in the MailChimp portal.

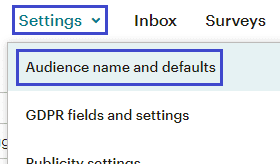
To see Audience Id – On the same page, scroll down and click on Setting >> Audience name and defaults. It will navigate to another page and there you can see the newly created audience name & id, see the below screenshots.

2. Add Subscribers
The Next step is to add subscribers to an audience.
Note: Subscriber or Member or email id – all are the same.
The below code shows how to add a member’s emailId, first & last name. Add it to MailChimpHelper class and call this method from the business class.
public static async Task<Member> MemberAddOrUpdateAsync(string apiKey, string listId, SubscribeProperty subscribe)
{
    //To add email address
    var member = new Member { EmailAddress = HttpUtility.HtmlEncode(subscribe.Email.ToLower()), Status = Status.Subscribed };
    await new MailChimpManager(apiKey).Members.AddOrUpdateAsync(listId, member);

    //To update First & Last Name
    if (!string.IsNullOrWhiteSpace(subscribe.FirstName))
    {
        member.MergeFields.Add("FNAME", HttpUtility.HtmlEncode(subscribe.FirstName));
    }
    if (!string.IsNullOrWhiteSpace(subscribe.LastName))
    {
        member.MergeFields.Add("LNAME", HttpUtility.HtmlEncode(subscribe.LastName));
    }

    return await new MailChimpManager(apiKey).Members.AddOrUpdateAsync(listId, member);
}
The below code shows adding more than one subscriber by using foreach loop, in business class.
public async Task AddUpdateMembers()
{
//Get newly registered users from database
var newUsers = GetNewUsers();
var existingAudienceId = "7f7cb00b8f";
foreach (var user in newUsers)
{
SubscribeProperty subscribe = new SubscribeProperty
{
Email = user.subscribers_id,
FirstName = user.first_name,
LastName = user.last_name
};
await MailChimpHelper.MemberAddOrUpdateAsync(apiKey, existingAudienceId, subscribe);
}
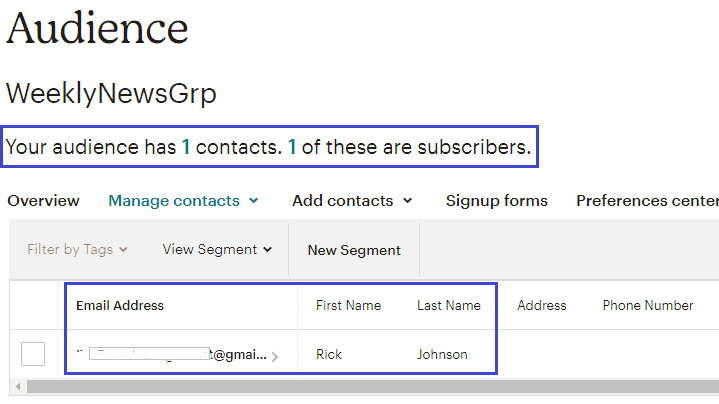
}The below screenshot confirms the added or updated email address, first and last name via code can be seen in the portal as well.
Additionally, you can specify one or more tags to an email address, below are the lines of code to add tags.
Tags tags = new Tags();
tags.MemberTags.Add(new Tag() { Name = "Promo", Status = "active" });
await new MailChimpManager(apiKey).Members.AddTagsAsync(listId, "[email protected]", tags);
Code – To delete a Member
public static async Task MemberDeleteAsync(string apiKey, string listId, string emailId)
{
	IMailChimpManager mc = new MailChimpManager(apiKey);
	await mc.Members.DeleteAsync(listId, emailId);
}
Code – To get all Member lists based on ListId(AudienceId)
public static List<string> GetMembersAsync(string apiKey, string listId)
{
    var members = new MailChimpManager(apiKey).Members.GetAllAsync(listId).Result;
    return members.Select(s => s.EmailAddress).ToList();
}
3. Create a Template
A template is required to create any Campaign. Add the below code in MailChimpHelper class which will return the newly created template Id. It is better to save the template Id in the database, for later use.
public static async Task<int> TemplateCreateAsync(string apiKey, string templateName, string UnlayerContent)
{
    var template = await new MailChimpManager(apiKey).Templates.CreateAsync(templateName, string.Empty, UnlayerContent);
    return template.Id;
}
Important – You need to pass full Html content as a string that contains all text, images, buttons, links, and other inputs. Third-party control needs to be integrated if you want to generate such content from your application.
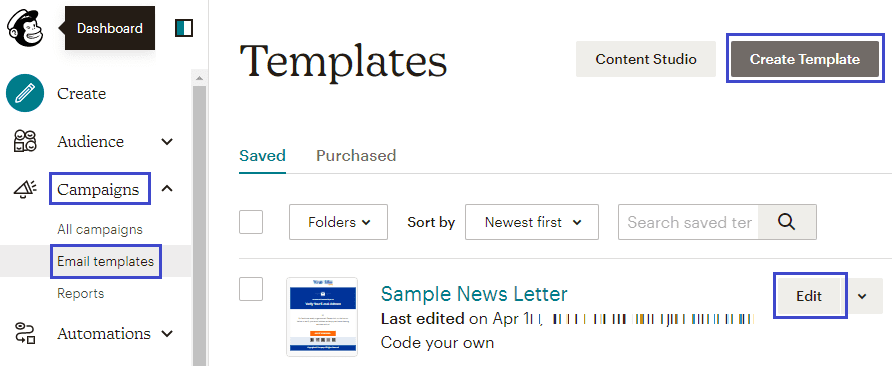
To check created Template in the portal – Go to Campaigns >> Click on Email template, as shown in the below screenshot.
4. Create a Campaign
The final step is to create a Campaign and send emails with the Template(body content) to all the subscribers for an Audience. Add the below code and call it from business class.
public static async Task<string> CampaignAddAsync(string apiKey, string audienceId, int templateId, string issueTitle, string fromName)
{
MailChimpManager mc = new MailChimpManager(apiKey);
var replyTo = await mc.Lists.GetAsync(audienceId);
Campaign cp = new Campaign
{
Recipients = new Recipient { ListId = audienceId },
Settings = new Setting
{
TemplateId = templateId,
FromName = fromName,
SubjectLine = issueTitle,
Title = issueTitle,
ReplyTo = replyTo.CampaignDefaults.FromEmail,
},
Type = CampaignType.Regular,
};
var campaign = await mc.Campaigns.AddOrUpdateAsync(cp);
await mc.Campaigns.SendAsync(campaign.Id);
return campaign.Id;
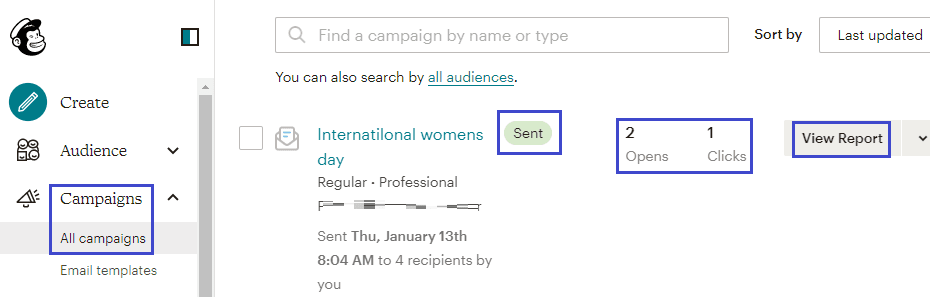
}To check it in the portal – Go to Campaigns >> click on All campaigns and check the status of the newly created Campaign, as shown in the below screenshot.
That’s it, we have seen how to send newsletters or marketing emails by using the MailChimp package in .Net code. Points to remember – we need an Audience Id, a list of email addresses, and a template Id to create a Campaign.
MailChimp Campaign Report
Once the campaign is sent you can track and check the report to know the total number of emails sent, success or failure delivery, opened, subscriber clicks, send time, Unsubscribe & its reason, and more.
I usually use the below lines of code to get the Campaign report, but there are different types of reports available that you can explore.
// To get sent report
IEnumerable<SentTo> sendResults = new MailChimpManager(apiKey).Reports.GetSentToRecipientsAsync(campaignId).Result.Where(w => w.Status == "sent");
// To get report of each email and its activities
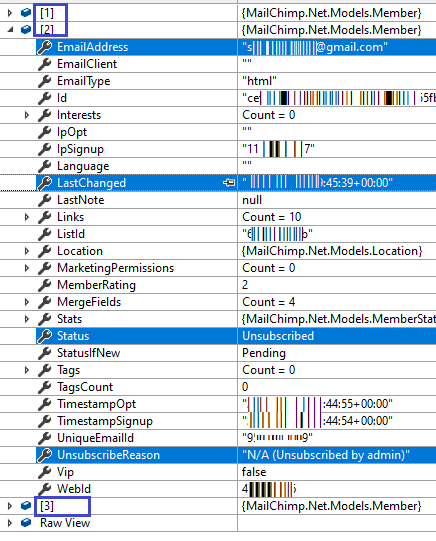
var emailActivities = await new MailChimpManager(apiKey).Reports.GetEmailActivitiesAsync(campaignId); Debug – Report screenshots

Thanks 🙂
- Validate JSON, Format & Beautify JSON
- SSN Extractor
- UUID/GUID Extractor
- URL Extractor
- MAC Address Extractor
Wonderful article, easy to understand, neat explanation with code and screenshots.
Hello, I would like to ask if it’s possible to not specify a specific Template for a Campaign if I just want to send some simple text. My problem now is that I don’t know how to replace a specific section in the Template with my custom text, and I’m not quite sure how to do this.
Great examples and clearly laid out. I’ve tried to get an API call working from behind a proxy server using this library, do you know if its possible? my code works fine without a proxy.