Top 80+ Web API Interview Questions & Answers

Here are the top 80+ Web API interview questions and answers for beginners and professionals.
Other Interview Questions – OOPs, C#, SQL
Web API Interview Questions & Answers
Download all Questions as .PDF
What is Web API?
A Web API is a framework that allows you to build HTTP services that can be consumed by a broad range of clients, including browsers, mobile devices, and other servers. It is a core component of the ASP.NET framework and is often used to create RESTful services. In other words, a Web API is an Application Programming Interface for the Web.
What are the Key Concepts of Web API?
- HTTP Services: Web APIs are built on top of HTTP, which is the foundation of web communication. You can use the standard HTTP methods like GET, POST, PUT, DELETE to perform CRUD (Create, Read, Update, Delete) operations.
- RESTful Services: Web API is often used to create RESTful services. REST (Representational State Transfer) is an architectural style that uses HTTP methods to operate on resources identified by URLs. Web APIs expose endpoints (URLs) that correspond to these resources.
- Serialization: Data is typically exchanged in formats like JSON or XML. ASP.NET Web API provides out-of-the-box support for these formats, making it easy to serialize and deserialize data.
- Routing: ASP.NET Web API uses routing to map HTTP requests to the appropriate controller actions. The routing mechanism can be customized to meet the specific needs of your application.
Why Use Web API?
- Interoperability: Web API allows different clients (such as web browsers, mobile applications, or even other servers) to interact with your application, regardless of the platform or language they are built in.
- Lightweight: Unlike WCF (Windows Communication Foundation), which is more complex and suitable for service-oriented applications, Web API is lightweight and designed specifically for HTTP services. This makes it faster and more suitable for web-based scenarios.
- Scalability: Since Web API is stateless, it is highly scalable. Each request is independent of others, which is a key factor in building high-performance, scalable applications.
- Testability: Web APIs are easy to test. You can use tools like Postman or write unit tests to test the API endpoints without needing a user interface.
- Integration with .NET Core: ASP.NET Core Web API, the cross-platform version, allows you to build and deploy Web APIs that run on various operating systems, including Windows, Linux, and macOS.
What are some common use cases for Web API?
Common Use Cases for Web API:
- Single Page Applications (SPAs): Web APIs are often used as the backend services for SPAs built with frameworks like Angular, React, or Vue.js.
- Mobile Applications: Mobile apps commonly interact with a backend via Web APIs to fetch and update data.
- Microservices: In microservices architecture, each microservice might expose a Web API to communicate with other services or clients.
Explain the REST architectural style.
The REST (Representational State Transfer) architectural style is a set of principles for designing networked applications, particularly web services. REST is an architectural style, not a standard or protocol, and it is primarily used for designing APIs that can communicate over HTTP.
Key Principles of REST:
- Resource-Based: Resources are identified by URIs (Uniform Resource Identifiers). For example, ‘https://api.example.com/users/123’ might represent a user resource with the ID 123.
- Stateless Communication: RESTful services are stateless, meaning each HTTP request from a client to a server must contain all the information the server needs to fulfill that request. The server does not store any state information about the client session between requests or does not need to keep track of multiple client sessions.
- Standard HTTP Methods (verbs): perform operations on resources – Get, Post, Put, Delete, Patch.
- Representation of Resources: Resources can have multiple representations, such as JSON, XML, or HTML, depending on what the client requests and what the server can provide. This is handled via content negotiation (using the Accept header in HTTP).
- Uniform Interface: REST promotes a uniform interface between clients and servers and this uniformity is achieved through consistent use of URIs, HTTP methods, headers, and status codes.
- Layered System: The client may not know whether it is communicating with the end server or an intermediary (such as a load balancer or a cache).
- Cacheable: Responses from RESTful services should explicitly indicate whether they are cacheable or not, using appropriate HTTP headers. Caching improves performance by reducing the number of client-server interactions.
- Client-Server Architecture: REST is based on a client-server architecture where the client and server have distinct responsibilities. The client handles the user interface, and the server manages and processes the resources. This separation of concerns allows for independent development and scaling of the client and server components.
What are the advantages of REST?
- Scalability: Because of its stateless nature, REST APIs can easily scale to handle a large number of clients.
- Performance: RESTful services can be made more performant by leveraging caching mechanisms.
- Flexibility: REST APIs can interact with different types of clients, including web browsers, mobile applications, and IoT devices, without needing client-specific adaptations.
- Interoperability: RESTful services can be consumed by different clients written in various programming languages, making it a highly interoperable architecture.
What is a RESTful service, and how does it relate to Web API?
A RESTful service is an application that follows the principles of Representational State Transfer (REST), which is an architectural style for designing networked applications. It uses standard HTTP methods (GET, POST, PUT, DELETE) to perform CRUD (Create, Read, Update, Delete) operations on resources, which are typically represented by URLs.
In the context of Web API, a RESTful service is implemented using ASP.NET Web API to create HTTP-based services that are accessible via the web, allowing different clients (browsers, mobile apps, etc.) to interact with the server-side resources in a stateless manner.
What is the difference between REST and SOAP in the context of Web APIs?
REST is ideal for simpler, stateless, and scalable web services with lightweight communication, commonly using JSON.
SOAP is better suited for enterprise-level services requiring strict standards, security, and ACID transactions, using XML.
| REST | SOAP |
|---|---|
| REST is an architectural style, not a protocol. It uses standard HTTP protocols (GET, POST, PUT, DELETE, etc.). | SOAP is a protocol that operates over HTTP, SMTP, and other protocols. |
| REST typically uses JSON or XML for data interchange, with JSON being more common due to its lightweight nature. | SOAP uses XML exclusively for message formatting. |
| REST is generally simpler and easier to implement, making it suitable for web-based applications. | SOAP is more complex with strict standards, suited for enterprise-level applications. |
| REST is stateless, meaning each request from a client to the server must contain all the information needed to understand and process the request. | SOAP can be stateless or stateful, supporting operations like maintaining a session. |
| REST is lightweight and faster because it typically uses JSON, which is less verbose than XML. | SOAP is generally slower due to the overhead of XML and additional processing. |
| REST relies on HTTPS for security, with authentication methods like OAuth. | SOAP has built-in security features like WS-Security for message-level security. |
| REST uses standard HTTP status codes for error handling (e.g., 404 for Not Found, 500 for Internal Server Error). | SOAP has its own set of error handling standards through the use of <fault> elements in the XML response. |
| REST does not require a strict contract; the API can evolve over time. | SOAP requires a service contract defined by WSDL (Web Services Description Language). |
| REST is more flexible and allows for multiple formats (JSON, XML, HTML, etc.) based on client needs. | SOAP is rigid due to strict protocols and XML format. |
| REST is commonly used for web services and public APIs where simplicity, scalability, and performance are key. | SOAP is often used in enterprise environments where robust security, ACID compliance, and formal contracts are required. |
What are different standard HTTP methods?
In RESTful APIs, standard HTTP methods (also known as HTTP verbs) are used to perform operations or specific actions on resources. and they follow the CRUD (Create, Read, Update, Delete) pattern.
Here are the main HTTP methods:
- GET: Retrieve data.
- POST: Create a new resource.
- PUT: Update or create a resource.
- DELETE: Remove a resource.
- PATCH: Apply partial updates.
- OPTIONS: Discover available methods.
- HEAD: Retrieve headers without the body.
What is the difference between [HttpGet], [HttpPost], [HttpPut], and [HttpDelete] attributes?
| Attribute | HTTP Method | Usage | Purpose |
|---|---|---|---|
| [HttpGet] | GET | Read data | Retrieves data from the server without modifying it. Typically used for fetching resources. |
| [HttpPost] | POST | Create data | Sends data to the server to create a new resource. Often used for submitting forms or posting data. |
| [HttpPut] | PUT | Update data | Updates an existing resource on the server. Usually requires the entire resource to be sent for updating. |
| [HttpDelete] | DELETE | Delete data | Removes a resource from the server. Used for deleting resources identified by a URI. |
What are the differences between PUT and PATCH?
| PUT | PATCH |
|---|---|
| Replaces the entire resource with the provided data. | Updates only the specified fields in the resource. |
| Request Body contains the full representation of the resource. | Request Body contains a partial representation with only the changes. |
| PUT is idempotent, meaning multiple identical requests result in the same outcome. | PATCH is also idempotent, but only if the changes are the same each time. |
| Use when you want to update all fields of a resource, even if only a few fields are changed. example – Updating a user’s entire profile information. |
Use when you want to update only specific fields or parts of a resource. example – Updating just the email address of a user. |
What is CRUD? What is the syntax for CRUD operations in Web API?
CRUD stands for Create, Read, Update, and Delete. These are the four basic operations that can be performed on data in a database or any persistent storage system.
- Create: Adding new data or records to a database (e.g., adding a new user).
- Read: Retrieving or reading data from the database (e.g., fetching user details).
- Update: Modifying existing data or records in the database (e.g., updating user information).
- Delete: Removing data or records from the database (e.g., deleting a user account).
What default Structure do you see once a new Web API project is created in .NET?
Once the project is created, you’ll see the following structure:
- Controllers: This folder contains your API controllers, where each controller defines endpoints.
- Program.cs: The entry point of your application where the application is configured.
- appsettings.json: Configuration file for your application settings.
- Startup.cs: (For older .NET Core versions) Contains configuration and services setup.
- Properties/launchSettings.json: Contains settings for debugging and launching your application.
What are Controllers and Actions in Web API?
Controllers are classes that handle incoming HTTP requests. They group related actions together, usually focused on a specific resource (like “Products” or “Users”).
Actions are methods within controllers that process specific requests. Each action corresponds to an HTTP request type (like GET, POST, PUT, DELETE) and performs operations like retrieving data, creating new entries, or updating records.
What is Routing in Web API?
Routing in a Web API is the mechanism that maps incoming HTTP requests to specific action methods in a controller. It determines how the requests are processed and which actions should handle them based on the URL, HTTP method (GET, POST, PUT, DELETE, etc.), and other route data.
Types of routing in Web API
In a Web API, there are two main types of routing:
1) Attribute-Based Routing: Routes are defined directly on the controller and action methods using attributes like [HttpGet], [HttpPost], etc. Provides more control over the routes, allowing for customized and complex URL structures.
2) Conventional Routing: Routes are defined globally in a central place, typically in the Program.cs or Startup.cs file, using a pattern that applies to all controllers (for older versions of ASP.NET Core). Best for simpler applications where all controllers follow a consistent or standard URL structure.
What is Route Prefix?
Route Prefix is a common route path applied to all routes within a controller, allowing you to avoid repeating the same base path for each action method.
You can apply a common prefix to multiple routes using the [Route] attribute at the controller level.
What is Route Constraint in Web API?
Route constraints are rules that restrict route parameters to specific types or patterns, like requiring an integer ({id:int}) or a specific format, ensuring valid data is passed to action methods.
You can specify parameters in routes and apply constraints to them.
[HttpGet("products/{categoryId:int}/items/{itemId:int}")]
public IActionResult GetItemByCategory(int categoryId, int itemId)
{
    return Ok($"Category ID: {categoryId}, Item ID: {itemId}");
}
How do you use Route Naming in Web API, and why is it useful?
Route naming allows you to assign a name to a route, which you can use to generate URLs dynamically within your application. Route names are useful for generating links, so that you can include a link in an HTTP response. To specify the route name, set the Name property on the attribute.
Difference Between Created, CreatedAtAction and CreatedAtRoute
Created, CreatedAtAction, and CreatedAtRoute are methods used to return a response indicating that a resource has been successfully created. They differ in how they specify the location (URI) of the newly created resource.
- Created: Returns a 201 Created status code with a Location header containing the URI of the created resource. Use when you already know the exact URI of the newly created resource.
- CreatedAtAction: Returns a 201 Created status code and automatically generates the Location header based on a specific action. Use when you want the framework to generate the URI for the newly created resource based on a specified action method in the current or another controller.
- CreatedAtRoute: Returns a 201 Created status code and automatically generates the Location header based on a named route. Use when you want the framework to generate the URI for the newly created resource based on a named route.
How do you handle URL parameters in Web API?
URL parameters (also known as route parameters) can be handled by defining them in the route template and binding them to method parameters in your controller. Here’s how you can handle URL parameters:
- URL Parameters in Route Template:
- Optional URL Parameters:
- Query String Parameters:
How do you handle multiple versions of a Web API?
Handling multiple versions of a Web API is essential when you need to support different versions of your API while maintaining backward compatibility for existing clients.
Common Versioning Strategies:
- URI Path Versioning: The version number is included in the URL path of the API endpoint.
Advantages: Clear and easy to understand. Makes it straightforward to manage multiple versions.
GET /api/v1/products
GET /api/v2/products
Disadvantages: Can lead to duplication of routes. Less flexible if versioning requirements become complex. - Query String Versioning: The version number is passed as a query string parameter in the API request.
Advantages: Keeps the URI structure clean.
GET /api/products?version=1
GET /api/products?version=2
Disadvantages: Can be less discoverable or intuitive for clients. May be overlooked in caching mechanisms. - Header Versioning: The version number is specified in the HTTP headers of the request.
Advantages: Separates versioning information from the URI. Allows the URI to remain clean and consistent.
GET /api/products
Headers: API-Version: 1
Disadvantages: Not immediately visible in the URI. Clients need to be aware of the correct headers to use. - Namespace Versioning: Different versions of the API are separated by using different namespaces in the codebase.
Advantages: Clean organization of code.
Version 1 Controller: Controllers.V1.ProductsController
Version 2 Controller: Controllers.V2.ProductsController
Disadvantages: Can lead to duplicated code if not managed properly. - Accept Header Versioning (Media Type Versioning): The version is specified in the Accept header as part of the media type.
Advantages: Clean URI. Allows for content negotiation.
GET /api/products
Headers: Accept: application/vnd.yourapi.v1+json
Disadvantages: Complex for clients to understand and implement. Less intuitive.
Explain the use of IHttpActionResult in returning HTTP responses.
IHttpActionResult is an interface that simplifies the process of creating HTTP responses. It provides a clean and standardized way to return responses from API actions. It provides built-in methods to generate common HTTP responses (e.g., Ok, BadRequest) and this reduces the need to manually create HttpResponseMessage objects.
Common ‘IHttpActionResult’ Methods:
- Ok(): Returns a 200 OK response.
- BadRequest(): Returns a 400 Bad Request response.
- NotFound(): Returns a 404 Not Found response.
- Created(): Returns a 201 Created response with a URI to the newly created resource.
- Unauthorized(): Returns a 401 Unauthorized response.
What is Middleware?
Middleware is a fundamental concept where various components are assembled into a pipeline to handle HTTP requests and responses. Each middleware component can perform operations before & after the next component in the pipeline is invoked and can handle tasks like logging, authentication, and error handling, and can either pass control to the next component or short-circuit the pipeline by returning a response directly. Middleware components are executed in the order they are registered in the Startup.cs file (Configure method).
How to Create Custom Middleware?
You can create custom middleware to handle specific tasks within the request pipeline. Creating custom middleware in ASP.NET Core Web API allows you to add custom processing logic to the HTTP request and response pipeline. Custom middleware can be used for tasks such as logging, request modification, response handling, or even custom authentication mechanisms.
Steps to Create Custom Middleware:
- Create a Custom Middleware Class: The custom middleware class needs to have a constructor that takes a RequestDelegate parameter and an Invoke or InvokeAsync method that processes the HTTP context.
- Register the Custom Middleware in the Request Pipeline: To use your custom middleware, you need to register it in the pipeline using the UseMiddleware extension method in the Startup.cs or Program.cs file.
(Optional) Middleware as an Extension Method: You can create an extension method to simplify the registration of your custom middleware, making it more reusable and easier to configure.
In what order are middleware components executed?
Middleware components execute the request in the order they are registered in the Startup.cs file in the Configure method. It’s important to add middleware in the correct order; otherwise, the application might not work properly. This order is crucial for ensuring security, performance, and proper functionality.
The following diagram shows the complete request processing pipeline.

What is Data Annotation?
Data Annotations are a set of attributes that you can apply to model properties or classes to enforce validation rules, specify formatting, and control how data is displayed. It ensures that the data received by API is correct and follows the rules.
Data Annotations are commonly used to validate user input like ‘required field’ validation and to specify metadata about a model such as display names, descriptions, or format strings. It allows you to apply validation and metadata directly in the model class.
Common Data Annotation Attributes:
| Attribute | Description |
|---|---|
| [Required] | Ensures that the property must have a value. |
| [Key] | Indicates that the property is the primary key of the model. |
| [DisplayName] | Specifies a friendly name for the property to use in UI or error messages. |
| [MaxLength] | Specifies the maximum length of an array or string property. |
| [MinLength] | Specifies the minimum length of an array or string property. |
| [StringLength] | Sets the maximum (and optionally minimum) length of a string. |
| [Range] | Ensures that a numeric value falls within a specified range. |
| [RegularExpression] | Validates the string against a specified regular expression pattern. |
| [EmailAddress] | Validates that the string is in a valid email address format. |
| [Phone] | Ensures that the string is in a valid phone number format. |
| [Url] | Validates that the string is in a valid URL format. |
| [Compare] | Ensures that two properties have matching values. |
| [CreditCard] | Validates that the string is in a valid credit card format. |
| [DataType] | Specifies the data type (e.g., Date, Time, Currency) for better formatting. |
| [DisplayFormat] | Specifies the format for displaying the data, like dates or currency. |
| [Timestamp] | Marks a property as a database timestamp for concurrency control. |
| [ScaffoldColumn] | Hides the property from scaffolding processes like generating forms. |
| [EnumDataType] | Ensures that the property matches a specified enum type. |
| [BindRequired] | Ensures that the property must be present in the incoming data during binding. |
| [BindNever] | Prevents a property from being included in model binding. |
What are HTTP response methods?
HTTP response methods are built-in methods used to generate and return specific HTTP status codes and messages in response to client requests. You can use various HTTP response methods to indicate the outcome of an API request. Each method corresponds to a specific HTTP status code and is used to communicate different types of responses to the client.
Common HTTP Response Methods:
| Method | Description | HTTP Status Code & Messages | Typical Use Case |
|---|---|---|---|
| Ok() | Returns a successful response with a 200 OK status code. Includes data if needed. | 200 OK | Use when a request is successful and you want to return data. |
| Created() | Indicates successful resource creation with a 201 Created status code. Includes the URI of the newly created resource. | 201 Created | Use when a new resource is created and you want to provide its location. |
| NoContent() | Indicates that the request was successful but there is no content to return. | 204 No Content | Use when the request is successful, but there is no data to return. |
| BadRequest() | Indicates that the request could not be processed due to client error (e.g., invalid input). | 400 Bad Request | Use when the request is malformed or invalid. |
| Unauthorized() | Indicates that the request lacks valid authentication credentials. | 401 Unauthorized | Use when authentication is required and the user is not authenticated. |
| Forbidden() | Indicates that the server understands the request but refuses to authorize it. | 403 Forbidden | Use when the user does not have permission to access the resource. |
| NotFound() | Indicates that the requested resource could not be found. | 404 Not Found | Use when the resource is not found. |
| Conflict() | Indicates that the request could not be completed due to a conflict with the current state of the resource. | 409 Conflict | Use when there is a conflict with the current state of the resource. |
| InternalServerError() | Indicates that the server encountered an error while processing the request. | 500 Internal Server Error | Use when an unexpected server error occurs. |
| NotImplemented() | Indicates that the server does not support the functionality required to fulfill the request. | 501 Not Implemented | Use when the requested functionality is not supported by the server. |
| ServiceUnavailable() | Indicates that the server is currently unable to handle the request due to temporary overload or maintenance. | 503 Service Unavailable | Use when the service is temporarily unavailable. |
What are Filters?
A filter is a component that allows you to run custom logic(code) before or after an action method is executed, helping you handle tasks like authentication, authorization, logging, validation and exception handling across your API. It allows injecting reusable logic into the request processing pipeline.
Types of Filters:
- Authorization Filters: Implements IAuthorizationFilter.
- Resource Filter: Implements IResourceFilter.
- Action Filters: Implements IActionFilter.
- Exception Filters: Implements IExceptionFilter.
- Result Filters: Implements IResultFilter.
You can apply a filter globally, at the controller level, or at the action method level.
What is Authorization Filter?
An Authorization Filter is a filter that checks whether a user or client is authorized to execute a specific action or access a resource before the action method is executed, ensuring that only users with the proper credentials, roles, or permissions can proceed with the request. If the user is not authorized, the filter can block the request and return an appropriate response, such as a ‘401 Unauthorized’ or ‘403 Forbidden’ status code. The [Authorize] attribute is a built-in authorization filter.
You can create a custom authorization filter by implementing the IAuthorizationFilter interface and it has one method that you can override:
- OnAuthorization(AuthorizationFilterContext) – Called early in the filter pipeline to confirm the request is authorized.
What is Resource Filter?
A Resource Filter is a filter that runs before and after the execution of the rest of the request pipeline. Resource filters are executed after authorization filters but before model binding (Action Filters, Exception Filters, and Result Filters), making them ideal for tasks like caching, enforcing model validation, or short-circuiting the request pipeline.
You can create a custom resource filter by implementing the IResourceFilter interface and for async type IAsyncResourceFilter interface. It has the following methods that you can override:
- OnResourceExecuted(ResourceExecutedContext) – Called after execution of the remainder of the pipeline.
- OnResourceExecuting(ResourceExecutingContext) – Called before execution of the remainder of the pipeline.
- OnResourceExecutionAsync(ResourceExecutingContext, ResourceExecutionDelegate) – Called asynchronously before the rest of the pipeline.
What is Action Filter?
An Action Filter is a filter that allows you to execute custom logic before and after an action method is executed. It’s useful for handling cross-cutting concerns like logging, validation, or modifying the result returned by an action.
You can create a custom action filter by deriving from the ActionFilterAttribute class and it has the following methods that you can override:
- OnActionExecuted(ActionExecutedContext) – Called after the action method executes.
- OnActionExecuting(ActionExecutingContext) – Called before the action method executes.
- OnResultExecuted(ResultExecutedContext) – Called after the action result executes.
- OnResultExecuting(ResultExecutingContext) – Called before the action result executes.
What is Exception Filter?
An Exception Filter is a filter that handles exceptions thrown during the execution of an action method. It allows you to catch unhandled exceptions, log them, and return a custom error response to the client with a specific HTTP status code & a custom error message. Exception filters are useful for centralizing error-handling logic across your application.
You can create a custom exception filter by implementing the IExceptionFilter interface or by deriving from the ExceptionFilterAttribute class and it has the following methods that you can override:
- OnException(ExceptionContext)
- OnExceptionAsync(ExceptionContext)
read full post: How to Create Custom Exception Filter in .Net Core C#?
What is Result Filter?
A Result Filter is a filter that runs before and after the execution of an action result, which is the final step in processing a request. Result filters allow you to modify the action result or response before it is sent to the client, providing an opportunity to change or add the content, headers, status codes, or perform any other post-processing tasks.
You can create a custom result filter by implementing the IResultFilter interface or by deriving from the ResultFilterAttribute class and it has the following methods that you can override:
- OnResultExecuted(ResultExecutedContext) – Called after the action result executes.
- OnResultExecuting(ResultExecutingContext) – Called before the action result executes.
- OnResultExecutionAsync(ResultExecutingContext, ResultExecutionDelegate) – Called asynchronously before the action result.
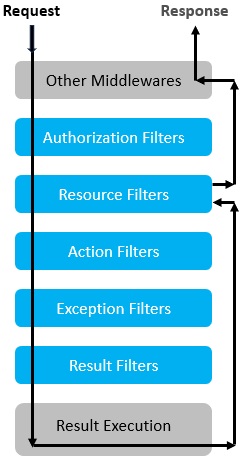
In which order are filters executed in the request processing pipeline?
Filters work by providing hooks into the request processing pipeline, allowing you to execute custom logic at various stages of the request and response.
Filters are executed in a specific order: Authorization Filters → Resource Filters → Action Filters → Exception Filters → Result Filters
The order of execution ensures that authorization happens first, followed by action execution, and finally, any result processing or exception handling. The following diagram shows how filter types interact in the filter pipeline:
What are the different ways to apply or implement filters in .NET Core Web API?
Multiple ways to apply filters, they are:
- Global-Level: Filters can be registered globally in the Startup.cs file, applying them to all controllers and actions in the application.
- Controller-Level: Filters can be applied to specific controllers by using [TypeFilter] or [ServiceFilter] attributes on the controller class.
- Action-Level: Filters can be applied to individual action methods by using [TypeFilter] or [ServiceFilter] attributes on the action method.
- Middleware-Based Filters: Custom logic similar to filters can be implemented using middleware, which operates at the application level.
How do you configure Filters globally?
You can add global filters in the ConfigureServices method, in Startup.cs file.
public class Startup
{
    public void ConfigureServices(IServiceCollection services)
    {
        services.AddControllers(options =>
        {
            // Add global filters here
            options.Filters.Add(new CustomActionFilter());
            options.Filters.Add(new AuthorizeFilter());
        });
    }
}
How do you implement content filtering in Web API?
There are different approaches to implementing content filtering in a Web API:
- Creating custom 'Action Filter': You can create a custom action filter by implementing IActionFilter interface or deriving from ActionFilterAttribute class to inspect & modify the content of request data before the action method is executed and then you can apply the custom filter globally, to specific controllers, or to individual actions.
- Creating Custom Middleware: Alternatively, you can implement content filtering as middleware to have more control over the entire request and response process.
What are the differences between the [ServiceFilter] and [TypeFilter] attributes?
Service Filter: Filters can be applied to a controller or action method using Dependency Injection by using the [ServiceFilter] attribute, allowing the filter to access services from the DI container. Since the filter is resolved through the DI container, you can inject services into the filter’s constructor. This is useful when the filter needs to use services like logging, data access, or any other service registered in the DI container. The [ServiceFilter] attribute takes the type of the filter as a parameter. The filter is then resolved from the DI container and applied to the controller or action method where the attribute is used.
Type Filter: Filters can be applied to a controller or action method using the [TypeFilter] attribute, which allows passing parameters to the filter’s constructor using the ‘Arguments’ property. Unlike [ServiceFilter], which directly uses the DI container to resolve the filter, [TypeFilter] creates a new instance of the filter using the specified type. If the filter’s constructor has dependencies that are registered in the DI container, [TypeFilter] will resolve and inject those dependencies automatically. [TypeFilter] is particularly useful when you need to apply a filter with parameters that are not known until runtime.
Comparison of the [ServiceFilter] and [TypeFilter] attributes in a tabular format.
| [ServiceFilter] | [TypeFilter] |
|---|---|
| Resolves the filter from the DI container. | Creates a new instance of the filter using the specified type, with dependencies resolved from DI. |
| Does not support passing parameters directly to the filter. | Supports passing parameters to the filter’s constructor via the Arguments property. |
| Use when the filter is already registered in the DI container and does not need runtime configuration. | Use when you need to configure the filter at runtime with specific parameters. |
| Reuses the same filter instance from the DI container, allowing scoped or singleton lifetimes. | Creates a new instance of the filter for each request, potentially leading to transient behavior. |
| Follows the lifetime specified in the DI container (e.g., Scoped, Singleton). | Each request typically gets a new instance, regardless of the DI lifetime configuration. |
syntax: |
syntax: |
What is URL rewriting and how do you implement it?
URL rewriting is a process where the URL requested by a client is transformed into another URL before it reaches the server’s request handler. This is often used for purposes such as improving SEO, providing clean and user-friendly URLs, or redirecting old URLs to new ones without changing the underlying resource. You need to add the URL rewriting middleware UseRewriter() in the request pipeline and define rules using RewriteOptions, in ‘Startup.cs’ file.
What is [NonAction] attribute and how do you use it?
The [NonAction] attribute is used to indicate that a particular method in a controller is not an action method. If you don’t want it to be exposed as an API endpoint and cannot be called by HTTP requests, you can decorate it with the [NonAction] attribute
What is the difference between IActionResult and ActionResult?
IActionResult and ActionResult are both used to define the return type of a controller action method, but they serve slightly different purposes and provide different levels of type safety and flexibility.
1) IActionResult is an interface that represents a result of an action method. It provides a contract for different types of HTTP responses, such as OkResult, BadRequestResult, NotFoundResult, etc. It is generally used when an action method can return different types of HTTP responses based on various conditions. Since it is not tied to a specific type, it offers flexibility but less type safety.
2) ActionResult<T> is a generic class that inherits from ActionResult and wraps a response of type T. It combines the benefits of IActionResult with type safety by allowing the action to return either a specific type T or an IActionResult. It is used when you want to return either a specific object (like a model) or an HTTP response. This allows for strong typing, which is particularly useful for scenarios involving serialization of data.
What are the different Service Lifetimes for Dependency Injection within ASP.NET Core?
There are 3 different types of service lifetimes defined by the .NET Core DI framework.
- Transient: A new instance is created every time the service is requested. This lifetime works best for lightweight, stateless services.
syntax: AddTransient<IService, Implementation>()
- Scoped: A new instance is created once per request.
syntax: AddScoped<IService, TImplementation>()
- Singleton: A single instance is created and shared throughout the application’s lifetime.
syntax: AddSingleton<IService, TImplementation>()
How do you manage Dependency Injection in a Web API project?
Dependency Injection (DI) is a design pattern that helps in creating loosely coupled, testable, and maintainable applications by managing the dependencies of objects. In an ASP.NET Core Web API project, DI is a built-in feature that allows you to inject dependencies into your classes rather than hard-coding them. Dependency Injection in a Web API project involves:
- Registering services in the Program.cs or Startup.cs file using AddTransient, AddScoped, or AddSingleton.
- Injecting dependencies into controllers, services, and middleware using constructor injection.
What is ModelState?
ModelState represents the state of model binding and validation for a request. Specifically, it is a dictionary that stores information about the validation errors that occurred during model binding.
The framework performs validation on the incoming data (e.g., checking required fields, data types, etc.).If any validation fails, the errors are stored in ‘ModelState’.
You can check if the ‘ModelState’ is valid using ModelState.IsValid property. This ensures that only valid data is processed.
If ‘ModelState’ is invalid(false), you can return a response with the validation errors, usually a ‘400 Bad Request’, along with the error details.
How do you check or automate Model Validation?
(or) What are the different methods to apply ModelState in an application?
ModelState can be checked manually in each action method or with an automatic approach which is generally applied globally. You can apply any approach according to your application needs to validate models in an application:
Different methods to apply ModelState:
- Manual Action-Level Model Validation: You can check ModelState manually in each action method to ensure the model is valid before proceeding with the business logic.
- Automatic Model Validation: You can automatically validate ModelState and return errors globally, without the need to manually check ModelState in each action. You can implement it in two ways:
- Using [ApiController] Attribute: The [ApiController] attribute automatically checks ModelState at the start of each request, before the controller action is invoked. If the model is invalid, it returns a ‘400 Bad Request‘ response with the validation errors. It automatically applies ModelStateInvalidFilter.
- Using Custom Filter: You can create a custom action filter using IActionFilter or ActionFilterAttribute to check the ModelState. It can be applied globally, to the specific controllers, or at each action level.
In any case, you need to create a Model property with validation rules using data annotations and for validation use ModelState.IsValid property to check if the model is valid.
How to disable automatic Model State Validation?
Automatic ModelState validation can be disabled both at the global and action levels:
- Using [SuppressModelStateInvalidFilter] property: The [SuppressModelStateInvalidFilter] is used to override the default behavior of automatic ModelState validation that comes with the [ApiController] attribute. You can use [SuppressModelStateInvalidFilter] globally or in scenarios where you want to handle ModelState validation manually for specific actions or controllers while still keeping the [ApiController] attribute on the controller.
- Removing the [ApiController] attribute: If you want to disable automatic ModelState validation for a specific action or controller while keeping it enabled globally, you can do so by removing the [ApiController] attribute from the controller and handling ModelState manually.
How to create Custom Data Annotation Validators?
You can create a custom validation attribute by inheriting from ValidationAttribute and override the IsValid method to implement custom validation logic. Apply the custom attribute to the model properties that need validation. Validate the model in your API controller and handle invalid models appropriately.
What is a message handler, and how do you use it in Web API?
Message handlers in Web API are components that process HTTP requests and responses. They act as a pipeline, allowing you to intercept, process, or modify HTTP messages before they reach the controller or after they leave it. Message handlers are particularly useful for tasks like logging, authentication, or custom request processing. You create a custom handler by inheriting from DelegatingHandler and registering it in the Web API configuration.
What are different strategies to protect Web API in .NET?
Securing a Web API in .NET involves a combination of authentication, authorization, HTTPS enforcement, CORS configuration, data validation, rate limiting, logging, and monitoring. Together, these strategies ensure that your API is protected against unauthorized access and potential threats.
- Authentication: Verify the identity of the user or system accessing the API like,
- JWT (JSON Web Tokens): Use tokens to authenticate requests. Clients include the token in the Authorization header.
- OAuth2/OpenID Connect: Implement industry-standard protocols for token-based authentication.
- API Keys: Simple method where clients include a key in their requests.
- Authorization: Control what authenticated users can access or do.
- Role-Based Authorization: Define user roles and restrict access to certain endpoints based on these roles.
- Policy-Based Authorization: Create custom authorization policies based on complex conditions.
- HTTPS (SSL/TLS): Configure the server to enforce HTTPS, ensuring that all communication between the client and server is encrypted.
- CORS (Cross-Origin Resource Sharing): Restrict which domains can access your API from a browser. Define allowed origins, methods, and headers in your API configuration.
- Data Validation and Sanitization: Validate and sanitize incoming data to protect against injection attacks. Use model validation attributes and sanitize inputs where necessary.
- Rate Limiting and Throttling: Limit the number of requests a client can make in a given time frame to protect against abuse. Use middleware or external services to enforce rate limits.
- Logging and Monitoring: Track API usage and detect suspicious activities. Integrate logging frameworks like Serilog and monitoring tools like Application Insights.
- Anti-Forgery Tokens: Protect against Cross-Site Request Forgery (CSRF) attacks. Use anti-forgery tokens in state-changing requests (e.g., POST, PUT).
How do you implement Custom Authorization filters in Web API?
Custom authorization filters allow you to enforce specific security requirements before an action method is executed. These filters can be used to implement custom logic to determine whether a user or request should be allowed to proceed.
Steps to Implement Custom Authorization Filters:
- Create a Custom Authorization Filter: Implement the IAuthorizationFilter interface or derive from AuthorizeAttribute to create a custom authorization filter.
- Apply the Custom Authorization Filter: Apply the filter to controllers or actions by using the [CustomAuthorize] attribute.
How do you handle Authorization in a Web API using Policies?
How do you implement a Custom authorization Handler? (See ‘Method 2’ in the example).
Authorization in a Web API using policies allows you to implement fine-grained access control by defining rules (policies) that determine whether a user is authorized to access specific resources or perform specific actions. Policies are defined in the ‘Program.cs’ or ‘Startup.cs’ file, and they can be based on roles, claims, or custom logic. You apply these policies using the [Authorize] attribute on controllers or actions, and you can also create custom authorization requirements for more complex scenarios.
What is OAuth?
OAuth (Open Authorization) is an open standard for token-based authentication and authorization, allowing third-party applications to access user data from another service (like Google, Facebook, or Twitter) without exposing the user’s credentials (e.g., username and password). OAuth is commonly used to grant secure access to APIs on behalf of a user, using access tokens rather than sharing login credentials.
OAuth is commonly used for single sign-on (SSO) and for authorizing applications to interact with APIs on behalf of a user.
The OAuth flow typically involves:
- The client requests authorization from the resource owner.
- The resource owner grants access and the authorization server issues an access token to the client.
- The client uses this token to access the resource server.
What is JWT?
JWT (JSON Web Token) is an open standard (RFC 7519) for securely transmitting information between parties as a JSON object. JWTs are widely used for authentication and authorization in web applications and APIs. They are compact, URL-safe, and can be easily transmitted between a client and a server.
A JWT consists of three parts:
- Header: Contains metadata about the token, including the type of token (JWT) and the signing algorithm used (e.g., HMAC SHA256).
- Payload: Contains the claims, which are statements about an entity (typically, the user) and additional data. Common claims include sub (subject, usually the user ID), exp (expiration time), and iat (issued at time).
- Signature: Ensures that the token hasn’t been altered. It’s created by signing the header and payload using a secret key and the specified algorithm.
How do you secure a Web API using JWT?
To secure a Web API using JWT, you need to follow these steps:
- Generate a JWT on User Authentication: When a user successfully authenticates (e.g., by providing a username and password), the server generates a JWT containing the user’s claims. The server then sends this token back to the client.
- Client Stores and Sends JWT: The client (e.g., a web or mobile app) stores the JWT, typically in local storage or a cookie. For each subsequent API request, the client includes the JWT in the Authorization header as a Bearer token.
- Configure JWT Authentication in the Web API: In your ASP.NET Core Web API, configure the JWT authentication middleware to validate incoming tokens.
- Protect API Endpoints: Use the [Authorize] attribute to secure your API endpoints, ensuring that only authenticated users with a valid JWT can access them.
- Handle Token Expiration and Refresh: JWTs typically have an expiration time (e.g., 30 minutes). When the token expires, the client should either re-authenticate or use a refresh token to obtain a new JWT.
How do you enforce SSL/TLS in a Web API?
You can use following steps to enforce SSL/TLS to ensures that all data transmitted between the client and server is encrypted, providing a secure communication channel.
- Using 'UseHttpsRedirection' & Enabling 'HSTS': Use the UseHttpsRedirection middleware to automatically redirect HTTP requests to HTTPS and enable HSTS(HTTP Strict Transport Security) using the UseHsts middleware to ensure all communication is done over HTTPS, in Startup.cs file.
- Configure HTTPS in 'launchSettings.json' Ensure that HTTPS is enabled in the launchSettings.json file, which is used during development to configure how the application is launched.
- Require HTTPS Globally: Optionally, use [RequireHttps] attribute to enforce HTTPS on specific controllers or actions.
How do you implement HTTP caching in Web API?
Implementing HTTP caching in a Web API can significantly improve performance by reducing the load on the server and decreasing the response time for clients. HTTP caching allows responses to be stored temporarily (cached) by clients or intermediate proxies, so subsequent requests can be served from the cache instead of recomputing the response.
HTTP caching in Web API can be implemented using several techniques:
- Cache-Control Header: The Cache-Control header is used to specify directives for caching mechanisms in both requests and responses.
- Expires header: The Expires header specifies a date and time after which the response is considered stale.
- OutputCache Attribute: The [OutputCache] attribute can be used to cache the output of an action method. However, it’s important to note that this is specific to ASP.NET Web API 2 and earlier versions.
- ETag header: It enables conditional caching to avoid sending unchanged data. If the resource hasn’t changed since the last request, the server can return a 304 Not Modified status instead of sending the full response.
- Response Caching Middleware: You can use the response caching middleware to enable caching.
How do you create a Custom Formatter in Web API?
Creating a Custom Formatter allows you to control how data is serialized and deserialized, enabling support for custom media types beyond the default JSON or XML.
Steps to Create a Custom Formatter:
- Create a Custom MediaTypeFormatter: Derive a class from MediaTypeFormatter or one of its built-in subclasses (BufferedMediaTypeFormatter, JsonMediaTypeFormatter, etc.) and implement the necessary methods for reading and writing content.
- Register the Custom Formatter in the Startup.cs or Program.cs file.
- Use the formatter in your controllers by specifying the media type it supports (text/custom in this case).
What is Session State?
Session state is a server-side storage mechanism that retains user-specific data across multiple requests within a web application.
How do you handle Session State in Web API?
You can maintain Session State in a Web API by using techniques such as server-side storage, client-side tokens, or distributed caching. Below are some common approaches to handling session state:
1) Using In-Memory Caching: Suitable for simple scenarios with a single server.
2) Distributed Session State: (Using Distributed Cache): Distributed cache is ideal for handling session state in environments where the API is hosted on multiple servers (e.g., in a cloud environment).
3) Client-Side Token-Based Session Management: Uses JWT tokens to manage session state client-side. In token-based authentication, session data can be stored in a secure token (e.g., JWT – JSON Web Token) and sent with each request.
Steps:
- Generate a token when the user logs in.
- Include the token in the Authorization header of each request.
- Validate the token on the server to retrieve the session data.
4) Using Cookies: Although not common in Web APIs, you can use cookies to store session data on the client-side. This method can be combined with server-side session storage or token-based authentication.
Each method has its use case depending on the application’s architecture, scalability, and security requirements.
How do you implement HTTP method overrides in Web API?
HTTP method overrides are used to allow clients to “override” the HTTP method of a request, typically when the client is limited to using certain HTTP methods like POST but needs to perform other operations like PUT. This is commonly achieved by using a special HTTP header X-HTTP-Method-Override.
What is form-data?
Form-data is a format used to send key-value pairs, including files, from a client (like a web browser) to a server, typically in an HTTP POST request. It’s commonly used for submitting forms that include file uploads.
Different between IFormFile and [FormForm].
IFormFile and [FormForm] are often used when a client sends a file or data using ‘multipart/form-data’ content type POST request, which is typically used when submitting forms with files or mixed data (multipart file uploads). Here are the differences:
| IFormFile | [FromForm] |
|---|---|
| Represents a file sent with the HTTP request. | Specifies that a parameter should be bound from form data. |
| Interface Type | Attribute Type |
| Used specifically for handling uploaded files. | Used to bind entire models or individual parameters. |
| Accessing file content and metadata in file upload scenarios. | Binding form data in multipart/form-data requests. |
| Focused only on handling individual file uploads. | Can be applied to complex objects containing multiple fields, including files. |
syntax: |
syntax: |
How do you upload and download files in a Web API?
1) File Uploading: Use IFormFile or [FromForm] as an action method parameter to upload files and store them on the server using a FileStream.
a. Using IFormFile Interface: IFormFile handles file uploads from the HTTP request and provides a way to access the uploaded file’s metadata (like file name and content type). For multiple file uploads use List<IFormFile>
b. Using [FromForm] attribute: [FromForm] binds form data (fields & file uploads) to action method parameters. IFormFile is used in conjunction with [FromForm] to handle file uploads along with other form data.
2) File Downloading:
To allow clients to download a file, read the file from the server using FileStream and use the base File() method to return a file stream as an IActionResult with the appropriate content type.
How do you Encode and Decode a URL or text?
Handling URL encoding and decoding ensures that special characters in the URL or text are properly processed. You can use System.Net.WebUtility or System.Uri classes.
1) URL Encoding: Converts special characters in a URL or text into a format that can be transmitted over the Internet. For example, spaces are replaced with %20.
2) URL Decoding: Reverts the encoded URL back to its original form, making it readable and usable in the application.
What is the difference between Transient, Scoped, and Singleton services in Web API?
| Service Lifetime | Description | Use Case Example |
|---|---|---|
| Transient | A new instance of the service is created each time it is requested. (Per request) | Use for lightweight, stateless services where a new instance is needed for each operation. |
| Scoped | A new instance of the service is created once per request or scope. (Per web request) | Use for services that need to maintain state within a single request but not across different requests, such as database context classes. |
| Singleton | A single instance of the service is created and shared throughout the application's lifetime. (Entire application) | Use for services that maintain state globally across the entire application, such as configuration settings or logging services. |
What is API rate limiting and how can it be implemented in Web API applications?
API rate limiting is a technique used to control the number of requests a client can make to an API within a specified time period. This helps prevent abuse, ensures fair usage, and protects the API from getting overloaded with too many requests. Rate limiting can be crucial for maintaining the performance, reliability, and security of an API. You can implement rate limiting using custom middleware.
How do you ensure backward compatibility when updating a Web API?
To ensure backward compatibility when updating a Web API, follow these practices:
- Versioning the API: Introduce new versions of your API rather than changing existing endpoints. Use versioning strategies like URL versioning (e.g., /api/v2/resource), query string parameters (e.g., /api/resource?version=2), or custom headers (e.g., api-version: 2.0).
- Deprecate Endpoints Gradually: Inform users in advance about deprecated endpoints or features. Provide a transition period where both the old and new versions are available.
- Add New Endpoints Instead of Modifying Existing Ones: Add new functionality through new endpoints rather than modifying the behavior of existing ones.
- Maintain Schema Compatibility: Ensure that changes to data structures (like adding new fields) are backward-compatible. Avoid removing or renaming existing fields in responses.
- Use Default Values for New Fields: When adding new fields to API responses or requests, provide default values so that old clients can continue working without changes.
- Contract Testing: Use contract tests to ensure that changes in the API do not break existing clients.
- Document Changes Clearly: Update the API documentation to reflect the changes, specifying the differences between versions and the impact on clients.
What is DTO (Data Transfer Objects)? How do you create and use DTOs in Web API?
DTO (Data Transfer Objects) is a simple object that ensures only necessary data is transferred across different layers of an application, particularly between the client and server in a Web API. DTOs typically contain only the data needed by the client, excluding any unnecessary or sensitive information.
1) Creating DTOs: Let’s say you have a Product entity class with several properties and it exposes some internal & sensitive information, as shown in the example:
2) You can create a ProductDTO to show only the necessary fields required & applicable to the client, as shown in the example:
3) Using DTOs in Web API: Once you have created DTO, you can use it in your Web API actions to ensure that only the required data is sent to or received from the client, as shown in the example:
How do you implement API response compression in Web API?
Implementing API response compression in a Web API can significantly reduce the size of the data sent over the network, leading to faster response times and reduced bandwidth usage. .NET Core provides built-in middleware for response compression, which can be added to your application in the Startup.cs file. Gzip and Brotli are commonly used compression algorithms supported by .NET Core. Here’s how you can implement response compression in a .NET Core Web API:
1) Install the Required Package: If it’s not already included in your project, you may need to install Microsoft.AspNetCore.ResponseCompression package.
2) Configure Response Compression in Startup.cs:
2.a) In the ConfigureServices method, add and configure the response compression middleware.
2.b) In the Configure method, add the UseResponseCompression middleware to the request pipeline.
3) Verify Compression in a Response: Once configured, the Web API will automatically compress responses based on the client’s Accept-Encoding header. Clients that support compression will receive compressed responses (e.g., gzip or brotli), while others will receive uncompressed data.
When you make a request to your Web API, you can verify that compression is working by checking the Content-Encoding header in the response.
If compression is applied, you should see a Content-Encoding: gzip header in the response.
- Compression Levels can be adjusted to balance between CPU usage and compression ratio.
- HTTPS Compression can be enabled, though it should be used with caution due to potential security considerations.
read more: Response compression (learn.microsoft.com)
How do you manage environment-specific configurations in Web API?
Managing environment-specific configurations ensures the application behaves correctly in different environments, such as Development, Staging, and Production. Here are some basic steps:
- Use appsettings.json Files: ASP.NET Core uses appsettings.json to store configuration settings. You can create different versions of this file for each environment:
- appsettings.json: Base configuration file.
- appsettings.Development.json: Configuration specific to the Development environment.
- appsettings.Staging.json: Configuration specific to the Staging environment.
- appsettings.Production.json: Configuration specific to the Production environment.
- Load Environment-Specific Settings: ASP.NET Core automatically loads the appropriate appsettings file based on the current environment. The environment is specified by the ASPNETCORE_ENVIRONMENT environment variable.
- Use Environment Variables: You can override settings in the appsettings.json files with environment variables. This is particularly useful for secrets like connection strings.
read more: Use multiple environments (learn.microsoft.com)
How do you implement request and response logging?
Middleware allows you to intercept and log the HTTP requests and responses as they pass through the pipeline. The logs will include information such as the HTTP method, the URL, and the response status code. The example shows:
- Creating a Custom Middleware for Logging.
- During logging, the response body is temporarily copied to a MemoryStream to allow logging without affecting the original response stream.
- Registering the Middleware.
- Example Output.
How do you use ApiExplorer to generate metadata about Web API endpoints?
ApiExplorer is a feature in ASP.NET Core that provides metadata about your Web API endpoints, such as route information, HTTP methods, and parameter details. This metadata can be used for various purposes, including generating API documentation with tools like Swagger. By default, ApiExplorer is enabled for controllers in an ASP.NET Core.
You can access the ApiExplorer metadata programmatically through dependency injection using the IApiDescriptionGroupCollectionProvider interface, which provides a collection of ApiDescriptionGroup, where each group contains metadata about the API controllers and their actions. ApiDescription represents a single API endpoint, including details like the HTTP method, route, and parameters. Here’s an example of how to access it within a controller:
Tools like Swagger (using Swashbuckle or NSwag) can automatically use ApiExplorer metadata to generate interactive API documentation.
read full post: How to Add Swagger in Web API .net core?
How do you configure CORS policy for different environments?
To apply different Cross-Origin Resource Sharing (CORS) policies for different environments (e.g., Development, Staging, Production) in a Web API ASP.NET Core, you can define environment-specific settings in your Startup.cs file. Here are the steps to configure CORS:
1) Add CORS Services: First, you need to add CORS services in the ConfigureServices method and configure different CORS policies for each environment.
2) Apply the CORS Policy Based on the Environment: In the Configure method, apply the appropriate CORS policy based on the environment in which the application is running.
How do you handle large data sets in Web API?
Here are some strategies to manage large data sets effectively:
- Pagination: Breaks data into manageable pages.
- Lazy Loading: Loads data only when needed.
- Filtering: Narrows down the data set.
- Sorting: Orders data for easier navigation.
- Data Streaming: Sends data as it’s processed.
- Compression: Reduces the size of data sent over the network.
- Asynchronous Processing: Improves responsiveness.
- Caching: Reduces database load for frequently requested data.
What is the difference between synchronous and asynchronous operations in Web API?
| Synchronous Operations | Asynchronous Operations |
|---|---|
| Blocks the thread until the task is complete | Does not block the thread, allowing other tasks to run |
| Can lead to performance issues in I/O-bound tasks | Improves performance, especially for I/O-bound tasks |
| Less scalable, as each request can tie up a thread | More scalable, freeing up threads for other requests |
| Easier to implement and understand | More complex, requires understanding of async/await |
| Best suited for simple, short-running tasks | Ideal for I/O-bound tasks that take time to complete (database, calling external services, or file I/O operations) |
How do you ensure the security of sensitive data in Web API responses?
Here are several strategies to achieve this:
- Use HTTPS and Encrypt Sensitive Data.
- Restrict Data by implementing Role-Based Access.
- Use DTOs (Data Transfer Objects) and expose only necessary fields or data.
- Implement detailed logging and auditing of API requests and responses, especially when sensitive data is accessed.
- Regularly review logs to detect and respond to any suspicious activity.
- Implement Content Security Policy (CSP) headers to help prevent cross-site scripting (XSS) attacks, which can lead to the exposure of sensitive data.
- Ensure Input Validation, incoming requests are properly validated and sanitized to prevent injection attacks.
- Add security headers like X-Content-Type-Options, X-Frame-Options, Strict-Transport-Security, etc., to protect against common web vulnerabilities.
What are cross-cutting concerns in Web API, and how do you address them?
Cross-cutting concerns in a Web API are aspects of the application that affect multiple layers or components of the application. These concerns are not specific to any one piece of functionality but are needed across different parts of the system. Examples of cross-cutting concerns include logging, authentication, authorization, error handling, data validation, caching, exception handling, Response Formatting, and Rate Limiting.
Different ways to address Cross-Cutting Concerns:
- Configuring Middleware: It allows you to execute code before and after the request is processed by the application. For example, you can implement logging, authentication, and error handling as middleware components.
- Creating Filters: Filters like AuthorizationFilter, ActionFilter, ExceptionFilter, and ResultFilter that can be applied at the controller or action level.
- Implementing Dependency Injection (DI): Use DI to manage dependencies such as logging services, authentication handlers, and configuration services.
- Applying Attributes: You can create a custom [ValidateModel] attribute to enforce model validation.
- Global Configuration: Configure global settings in the Startup.cs files like response formatting and security policies.
What is the role of IServiceCollection in configuring Web API services?
IServiceCollection is used to register and configure services that the application will use during its runtime. This registration is typically done in the Startup.cs file as part of the application’s dependency injection (DI) setup.
Key Roles of IServiceCollection:
- Service Registration: It is used to register services with different lifetimes (e.g., singleton, scoped, transient) that your application depends on. This allows you to inject these services into controllers, middleware, or other services as needed.
- Middleware and Framework Services: It is used to register framework services, such as authentication, authorization, logging, and configuration services.
- Dependency Injection (DI): It facilitates the Dependency Injection (DI) pattern allowing you to register services and configure how they should be resolved.
- Extensibility: The IServiceCollection interface is extensible, allowing you to add custom service registration extensions. This is often used in third-party libraries or to encapsulate complex service registrations into simple extension methods.
How do you implement a custom JSON converter in Web API?
To implement a custom JSON converter in a Web API, you can create a custom JSON converter by inheriting from the JsonConverter class in .NET. This allows you to control how specific types are serialized and deserialized to and from JSON.
Steps to Implement a Custom JSON Converter:
-
Create a Custom JsonConverter: Create a class that inherits from JsonConverter<T>, where T is the type you want to customize the serialization and deserialization process for. Override the Read and Write methods to define the custom logic.
-
Register the Custom Converter: Register the custom JSON converter globally in the Startup.cs file.
-
Use the Custom Converter in a Specific Property: If you want to use the custom converter for specific properties rather than globally, you can apply the [JsonConverter] attribute to the property.
How do you handle streaming responses in Web API?
Streaming can be handled using the Controller’s base File() method or FileStreamResult class.
FileStreamResult can be used to stream a file from the server to the client without loading the entire file into memory.
In the same way, the File method has several overloads that also accept a Stream as an input parameter and return a FileStreamResult.
How do you use the ProblemDetails class for standardized error responses?
The ProblemDetails class is used to provide standardized error responses that conform to the ‘RFC 7807’ specification for problem details. This helps create consistent and informative error responses across your API.
How do you implement background services in ASP.NET Core Web API?
Background services can be implemented using the IHostedService interface or by deriving from the BackgroundService class. Background services are long-running processes that can execute independently of the main web request processing pipeline.
When to use?
- Processing Queue Messages: Continuously process messages from a queue.
- Scheduled Tasks: Perform periodic tasks like clearing caches or sending notifications.
- Polling Services: Poll external services or APIs for updates.
Steps to Implement a Background Service:
- Create a Background Service Class: Implement the IHostedService interface or derive from BackgroundService.
- Override the ExecuteAsync Method: The ExecuteAsync method contains the logic for the background task. It runs in the background and is called when the service starts.
- Register the Background Service: Register the background service in the Dependency Injection (DI) Container using AddHostedService<T>() in the Startup.cs file.
How do you implement HTTP/2 in Web API?
Implementing HTTP/2 in an ASP.NET Core Web API application primarily involves configuring the server to support the HTTP/2 protocol. ASP.NET Core has built-in support for HTTP/2 on Kestrel, IIS, and other web servers.
Steps to Implement HTTP/2:
1. Configure Kestrel for HTTP/2 (Default Configuration): Kestrel, the default web server in ASP.NET Core, supports HTTP/2 out of the box when using HTTPS. Typically, no additional configuration is required, but you can customize the setup if needed.
2. Configure IIS for HTTP/2: If hosting on IIS, HTTP/2 is automatically enabled if the following conditions are met:
- The application is served over HTTPS.
- The server runs on Windows Server 2016 or later, or Windows 10 or later.
No specific changes are needed in the application code.
3. Enable HTTP/2 for Other Servers: For other servers like Nginx or Apache, HTTP/2 must be enabled at the server level. Configuration may differ depending on the server.
4. Client Compatibility: Ensure that the clients consuming the API are compatible with HTTP/2.
Key Points:
- HTTPS Requirement: HTTP/2 requires HTTPS. Ensure SSL/TLS is properly configured.
- Automatic Fallback: If a client doesn’t support HTTP/2, the server automatically falls back to HTTP/1.1.
- Performance Benefits: HTTP/2 offers performance improvements like multiplexing, header compression, and more efficient resource loading.
You can configure HTTP/2 and HTTP/1.1 Fallback in Kestrel and this setup allows the server to handle both HTTP/2 and HTTP/1.1 requests, providing flexibility for clients with varying protocol support.
What is gRPC, and how does it compare to Web API?
gRPC is a high-performance, open-source framework developed by Google for building remote procedure call (RPC) APIs. It allows clients and servers to communicate directly by calling methods as if they were local, even though they might be on different machines. gRPC uses HTTP/2 for transport, and efficient binary serialization with Protocol Buffers (protobufs) as the Interface Definition Language (IDL), and offers features like bidirectional streaming, multiplexing of requests, header compression, and more.
Comparison Between gRPC and Web API:
| gRPC | Web API |
|---|---|
| HTTP/2 | HTTP/1.1 (typically), but HTTP/2 is also supported |
| Protocol Buffers (binary format) | JSON (text format) |
| High performance, low latency due to HTTP/2 and Protocol Buffers | Good performance, but generally slower than gRPC |
| Supports client, server, and bidirectional streaming | Limited streaming support (requires additional work) |
| Supports multiple languages (e.g., C#, Java, Go, Python) | Primarily focused on .NET languages, but can work with any HTTP-capable language |
| Best for high-performance, low-latency scenarios, microservices | Best for RESTful services, CRUD operations, simpler APIs |
| Strongly typed contracts, defined with Protocol Buffers | Typically defined with OpenAPI (Swagger) |
| Strong tooling support for generating client/server code | Strong tooling support for OpenAPI/Swagger |
| Requires learning Protocol Buffers and gRPC concepts | Easier to get started with for developers familiar with REST APIs |
| Not natively supported in browsers | Fully supported in browsers |
| Uses SSL/TLS and built-in authentication mechanisms | Uses SSL/TLS, OAuth, JWT, and other security methods |
When to Use?
| Use gRPC | Use Web API |
|---|---|
| When performance and efficiency are critical, especially in microservices architectures. | When building RESTful services that need to be consumed by a wide variety of clients, including web browsers. |
| When you need to support streaming scenarios (e.g., real-time chat, video streaming). | When simplicity and ease of integration with existing HTTP infrastructure are important. |
| When you require strongly-typed contracts and a binary data format. | When working with JSON or text-based data formats is preferable. |